Creations

Creations

Thursday, January 31, 2013

Project I have been struggling with for over a year

I saw a project last year and it was totally amazing. I requested the recipe from the creator but she never got back to me. I set in to figure it out on my own and worked towards it for over a year.
The project was a folded piece of double sided cardstock, and no matter what I did, I just couldn't get the folding part right. I came up with many unplanned creations from all this work, but it wasn't until recently that I finally got the measurements right and the folds where they needed to be. I am sharing this with you because many of us have been here. I am not exactly sure what this project will be used for, but for right now I am happy to have finally figured it out on my own.
*For this instruction part, I am using solid colored cardstock*

Supplies:   1 Pc. 12 x 12 double sided cardstock
                 1 Pc. Matching sold cardstock cut at 5 1/2 inches square
                 1 Pc. while cardstock cut at 5 inches square
                 score-pal, or other scoring method
                 brown ink, Pencil, ruler
                 deco edge punch

First, you will want to mark your 12 x 12 paper at 6 inches on all sided.  Can score at this point just enough to mark center point. Then score all sides at 3 inches the entire length of the page. Position paper in your scoring apparatus and score the center marks to each other.
Starting at the score lines at 3 inches, fold. then unfold and fold at the 6 inch lines.
Once all folds are made it will look like this.
Once everything is creased, you'll want to use your boarder punch to punch the deco edge around the entire page. Don't punch boarder prior to making these folds as it will not line up afterwards. ( I know.. 6 sheets later) 
Once your have punched your deco edge, Your last fold will be to fold each corner down towards the outside of your project. Now you can reach for your brown ( or whatever color you want to work with that matches your patterned cardstock) ink. Ink all edges of the paper, and then open and ink each folded line as well. When you fold it all back up it will expose the ink around each edge.
Adhere the white cardstock you cut at 5  inches square to the solid colored cardstock you cut at 5 1/5 inches square.. Stamp a sentiment or write a short note and adhere that to the center piece beneath the folded pockets.
You can then cut tags or insert small notes in to each pocket if you'd like.
I think that is about all the tips I have... the finished project should look somewhat like the image below. Hope you enjoyed this project.
I plan on using this (since it is the 1st) as a valentines day card to send to my honey. I plan on writing something on the inside and creating small tags to slip in here and there. For now until I can finish it, I just tied with with a bow, added a hand dyed paper flower and will finish it when I can.


Friday, January 25, 2013

just posting because I like this one...LOL


I made the lace roses from old lace I found.. Love how they turned out. Used a brad for the center
 

Wednesday, January 23, 2013

Canvas and Paper Crafts

So often, ideas come to me out of no where. With this project, I really had a lot of fun... I just set in and really had no idea what I was going to end up... I just knew what I wanted to start with and I let everything just fall into place.

I started with one idea, and it turned into something far beyond what I had expected. Handmade Paper is amazing to begin with, so I took an ordinary painters canvas that I picked up a while back and set in to cover it with some handmade paper I had. I used spray adhesive to attach it to the canvas. I love to mix my own glimmer mists, and create colors that aren't usually found in the ink isle or any craft shop. Once I sprayed the handmade paper, a bubbling effect started to happen that was a pleasant surprise.. I loved how this project was coming together so far.

Once this dried, I reaching into my box of tricks and started to pull out things that I wanted to use to embellish this project. At this point, I had no idea what I was going to do with it, I just knew that I was feeling creative and so far this was turning out nicer than I had imagined. I added a doily which I also sprayed with a custom color I created and started to lay different things around here and there. The more I looked at the layout, I realized that a 5x7 photo would be perfect for this project. I continued on without having a certain picture in mind as to not influence it in any certain direction.

A few sprigs here, a few paper flowers there, and into the metal embellishment box I dove. I wanted to use things that I have been holding for a special project, but in all actuality I have come to realize that every project is a special project -so the sky was the limit as to what I added next.

I wanted it to make a bold statement, but not be so over whelmed with embellishments that the picture got lost... so I kept the "less is more" idea close at hand.

In the end, I was really happy with how this was turning out.


When all was said and done, I was just taken back at what I had created... I am "the most" critical of my work, but this project really made me happy.

This very well may be my most favorite creation to date.

My Nephew Jason and his beautiful bride Aubrey   -    June 2012.

Tuesday, January 22, 2013

My Mothers Influence.. and a little bit from Dad Too...

I am the youngest of 6 children, ranging in age from 59 down to me at 41..
(shh.. don't tell anyone)

My mother has been a great inspiration to my crafting. Although she is not a paper crafter she has always been a crafter. Mostly quilting. I can remember as a child watching her sew and I believe it is those early memories that have made me want to sew on my pages more often. Kind of like combining our two worlds.

She has always loved the smaller patterns and although I joke with her that they are "Pajama" patterns, I tend to find some to be very fitting for certain projects.
I don't usually use pattern paper in my layouts, but lately I have been walking on the side of using them to add interest to my works.  This layout was so fitting of both the sewing and the pattern paper.

I think working with elements or colors out of the norm is good for a change... but I do prefer to use the more "Boyish" colors usually...


 I am off to sew something more my "boys" style....


Since I started Crafting, most of the things I have created have been focused around my boys and the area in which we live.  Below is a page I created with their hobbies in mind...

This little guy reminds me of my boys.. there for a while, especially during the summer fishin' was all they could think about. This little guy fit the bill perfectly. With his little bucket of fish, he turned out a lot cuter than I had anticipated. I stuck with good reliable colors for this.. browns and green.

Neutral tones seem to work well when you have boys.

Again with the stitching... Just love the added interest it brings to the page.

These are actual Fly Fishing Flies.. I pinched the barb as to not snag the page protector and to protect me from getting a hook stuck in my finger.. ( I am kind of accident prone lately)  I little out of the "norm "for a scrapbook page element, but anyone who knows me knows that when I build pages there are no limits to the stuff I will put on a page.. If It works.... IT WORKS!


In the end it not about what is or isn't on the page.. it is the picture right? The next time I have some photos of my boys fishing I will have a page all ready to go to celebrate them spending time together doing what they love to do.

I used to joke with my father that "Fishing is, a Jerk on One end, waiting for a Jerk on the other"... I guess I can't say that anymore.


Saturday, January 19, 2013

Just Add Scrap-Paper....

I don't know about you, but I tend to collect scraps of paper like I collect Grey Hair... It is everywhere. Last year I decided that enough was enough.... I wasn't going to sort it anymore, I was going to put it in a plastic bin and use it up.. Well, here I am a year later and I am finally starting to see the bottom of the plastic container.. I tend to use up my scraps on alter art projects... it just makes more sense than grabbing a full sheet for the small piece i tend to need.

Containers I have lots of.. it's the time I lack most days. But today I was able to squeeze aside about 20 minutes to work on a little something.

I grabbed an Empty Prima Flower container, some tacky tape, glue dots, a bit of ribbon, a bottle of stickles, a few brads and some Paper flowers that I had. The only thing left to do was to grab a scrap of paper from my stash.

Just my luck, I found a scrap that didn't even need to be trimmed.. it was just the perfect size. I attached it to the container using the tacky tape. For the little areas where the handle sits, I used a small hole punch to punch the paper so it would wrap around that area nicely. At the top and bottom of the container, I added strips of ribbon that I just got... (haven't put it away yet -so it has been staring at me all week...)


It was coming together nicely and I was trying to figure out what I could put inside when it was done. Then it occurred to me that this would be the perfect size for cookies. I have been wanting to bake some Peanut Butter cookies with Chocolate Kisses in the center for a while and now that I have a container for them, I just may do that.  In all honesty tho- the cookies will probley not last long enough in my house to see the container, but the thought was there...LOL

Thanks for stopping by :)


Friday, January 18, 2013

Inspiration from a Friend

I have many online friends, and for the most part we chat once in a while... and sometimes we chat for hours every day. It is amazing. I sometimes feel closer to my online friends, whom I have never had coffee with, have never shopped with, never met period, yet some of them I consider my closest friends... So this page I dedicate to  Pam L. Our friendship began on Facebook and now we talk everyday. I feel as if we have known each other for years. She has inspired me so much over the last month or so. She has introduced me to some amazing things and people... she has listened to me vent and helped me through some personal issues... and I am very thankful and I am truly blessed to call her "Friend".

So Pam... this one is for you:)

(Scrapin Bug Designs- Little Men at work)


* I couldn't find my chalks so I had to use water color crayons and a water pen to do my shading.. I think chalk will look better so I will add it to my bag for the next ones*

Thanks for stopping by :)


STT- Valentines Treats Hop

Welcome to the Scraps to Treasure Valentine Treats Blog Hop.
Scraps to Treasure is a group of crafty people who take their left over scraps and come up with beautiful and fun projects that center around a monthly theme. This month's theme was Valentine Treats and our crafters were put to task in creating something that used only scraps but was also... Valentine Treat related.

If you arrived from Robin S. - http://scrapandchat.blogspot.com/ , Jessi Buehrle at My Life in Arts N Crafts (http://mylifeinartsncrafts.blogspot.com/ ) is our hostess for this hop so please make sure you start at her blog.

Now lets see what Valentine Treats awaits us...

This is only my second blog hop challenge thingy so I really hope that I am doing this correctly. I made a treat purse that holds "Bubble Gum Salt Water Taffy" Supplies used were from my scrap stash. (was in a swap a few months back where everyone swapped their S"crap" and pulled some of these little goodies out of the box. Added was some Pink Gathered ribbon (SU) and pink Perfect Pearls. I used a punch (SU) for the butterflies and accented there bodies with the Perfect Pearls. I also added a bit of Perfect Pearls around the openning of the purse.. I filled it with candy and it is ready to be given away.

I love the colors together and the butterflies add just enough to give it wow.

Thanks for stopping by and seeing my creation, and if you'd like to follow me that would be awesome too!!!

Today Jessi from My Life in Arts’ n Crafts’ is giving away some goodies to be entered in to win this fabulous prize, you must…
1. Follow all the blogs In this hop 
2. Comment on all the blogs in the hop as well. 
3. Head on over to My Life in Arts’ n Crafts’ (link to http://www.facebook.com/MyLifeInArtsnCrafts) fan page and give it a like. If your come back to Jessi’s blog and leave a comment saying you did so get entered in for a second chance. And don’t forget to check Out Jessi’s etsy store new items added Monthly.

Here is what you can win:
A red blingage flower,
5 yards of soft pink seam binding ribbon,
15 yards of blossom twine, 15 yards of charcoal twine, 15 yards of Natural Jute twine, 15 yards of Pink Jute twine, bag of pink “dew drops”, 10 celo bags in 1” by 10” (these are great for M&M’s or two pencils for little valentine treats) 10 mini binder clips,

Thank you for taking the time to hop along with us today.   Your next stop is: 


Thursday, January 17, 2013

Projects created in under an hour

A while back I purchased some Acrylic frames on clearance, I didn't notice that most of them were cracked.. so rather than toss them out, I figured why not try and salvage them.... so off to the scraps pile I went.  Some ribbon, a few Inked Flowers, some die cuts and a pen and post it pad later this is what I came up with. Project took all of about 15 minutes from start to finish.

The pen sits nicely on the stack of post its, but as they are torn off and used, I figured that I would need a spot for the pen to sit, which is why I added the ribbon across the top.

Wednesday, January 16, 2013

"Imagination" and the world of Paper Crafting

My community is rich with Artistic People. Each month, they have an Art Cruise through downtown businesses and each business features a local artist. I am Happy to announce that during the month of February I will be the Featured Artist at the local Chamber of Commerce during the Art Cruise.

The theme of the show is "Imagination", pretty fitting for me since my store is called Imaginations. I have been asked to do a show showcasing the world of Paper Crafting and have exciting things to share. Also a part of my show during the cruise will be teaching people how to make valentines. I have two projects planned that I hope the community will enjoy. Rather than accept money for the supplies, I am simply asking those who participate to make a small donation to our local Food Bank. I will supply all materials needed to complete two cards for Valentines Day and in return I can help the community Food Bank.. It is a win win for sure. Participants will walk away with the knowledge of how to use something as simple as paper to create a handmade treasure and the community will benefit from their donation.


Supplies ready to go

The inside of one of my card projects

The Examples of the two Valentines Cards I will teach them.
Other things I plan to showcase during my show is how easy it is to work with paper and how the possibilities are endless when you work with paper. Its just a matter of "using your Imagination" really... and there is no limit to what you can create.

A huge basket of different handmade paper crafted items.

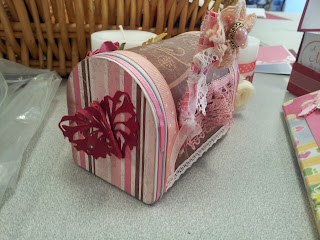
An Altered Mail Box
 If it has a surface, that surface can be covered with paper. With all the amazing lines out there the hardest part about planning an altered project is picking the paper. Lace, Ribbon, Buttons and Bling.... these are a few of my favorite things.

Decorated Candles
Candles make the perfect quick gift, and are both
useful and decorative. Just note that if you are planning on using the candles, the items will need to be removed, but in the meantime you can enjoy the beauty of something so practical and oh so easy to make.

"What we can easily see is only a small percentage of what is possible. "Imagination" is having the Vision to see what is just below the surface; to picture that which is essential, but invisible to the eye."


Decorated Note Cubes
  Note Cubes are another quick and easy gift and are so useful to have. A plain pad of paper has nothing compared to a decorated Note Cube. They can be customized to fit any holiday or occasion, and when working with color the sky is the limit cause everything goes with the white note paper.Add a small pen and you have a very practical item for just about anyone you want to share it with. *Great Teacher Gifts by the way!!*


Recipes Holders...  There is nothing more frustrating than to soil your recipe cards with egg when they are sitting on your counter. Recipe card holders keep your precious recipe's up off the counter and can be made to suit your deco. This particular Recipe Card Holder is made from "Recycled Wood Stamp Blocks". When it was all the craze to un-mounted the wooden stamps I couldn't imagine throwing out the blocks, I covered them with scraps of paper I had laying around awaiting that perfect project and glued an old fashion clothes pin to the top. Stuffed a paper clip down in the clothes pin and decorated the entire piece. How simple was that?
Another use for those little wood blocks-
something to spruce up your desk


Paper Crafting is Endless.. the only limit to what you create is finding the time to create it.

And Let us not forget the Scrapbooking Element of Paper Crafting.. the Scrapbook Pages.

Preserving memories and Celebrating the joy of those memories is worth every bit of everything. Pictures are important to us all. Showcasing them in a scrapbook page is a great way to share the story with everyone around us. Memories are our History and sharing our History with others for generations to come is worth the time and effort.

Pages can be simple or over the top it is all about how you create them. The most important part of a scrapbook page is the Picture and the story that goes with that picture. Again, the creation is completely up to you, and it is only limited by your imagination.

I hope you enjoyed this blog and thank you for stopping by. Create something magical.


Sunday, January 13, 2013

Butterflies, Dragon Flies and Cards OH MY!


Butterflies,  Dragon Flies 
    Cards
         Oh My!!!

I am not sure what it is about them, but I love them. They always make me feel better when I see them out and about. I try and use them in my creations because somehow, they symbolize transformation to me.
They are so delicate yet seem to survive regardless.

I like to believe that it is Gods way of reminding me of the bigger picture.
A silent way of telling me to slow down, take a breathe and enjoy the little things life has to offer.

When I look back at where I started as a crafter I realize that just like these amazingly beautiful little creatures, my creations have evolved into something that I am no longer hiding from the world. They may not look special to someone else, but they are special to me and because of that, I share my ideas as often as I can.

There are two types of people in this world; Givers and Takers.
It is up to each of us to choose which type we are. Sometimes we find that we are a bit of both... but in the end, the way we are, the way we treat each other, and the way we live our lives will transform someone else just by our actions or mere words. Caring is free- making a difference is priceless.

Flower Soft- what an amazing effect

When I first started scrapbooking and paper crafting, the biggest
"extras" you could add were Edged Scissors and Stickers.. boy how things have changed.
Dimension that is un-believable
With all the great embellishments out there that are pre-made, sometimes I forget the reason I started this hobby.. the Creative Element. Techniques are abundant and I love to learn new ways to spruce up my projects.


When I first heard about flower soft I thought, "It's just like embossing" and boy was I wrong.. With embossing, it is only one layer- but with Flower Soft... OMG the possibilities are endless...


To the left is a project I did at my shop to show how a pre-printed scrapbook paper could jump off the page with dimension. The paper was amazing to begin with, but the Flower Soft layers just made it incredible.

I decided to push my creativity and see what other projects I could create with Flower Soft... so I turned to my stash of Rubber Stamps. Now, most of my rubber stamps are very detailed, and to color them in with markers would take some time and sure enough if I went outside the lines, I would toss it and start again..(OCD..just a bit) but when I set in to pair them up with flower soft, I was amazed at how quick it went together.


I gathered my stash and a rubber stamp and started in. I Stamped on White Cardstock with Black ink.
 
Flower Soft has a special glue, and the tip on the bottle is very small for detailed work, so I started with the smallest areas and started to fill in the areas with the glue. Once glue was down, I sprinkled the various colors of flower soft onto the image, One Color at a Time ofcourse. i lightly press the flower soft into the glue and then tap off the excess and return it to the container for next time.
 
This particular project took me about 30 minutes to finish. When I was happy with the amount of colors from the flower soft, I grabbed my other favorite medium, Water Color Crayons to finish up the image. I love how it turned out.  Thanks for stoppin' by.